
Purple Belt Curriculum
Majest Martial Arts


At Purple Belt (6th gup), Majest students study Taegeuk Yi Jang (also romanized as Taegeuk Ee Jang), the second form in the Taegeuk series. At Majest, we teach that this form symbolizes a strong mind, clear and calm like the waters of a lake. The I Ching trigram (☱) for this form has a broken line at the top, which means that at the top of this form the student pivots in place, rather than stepping to turn. For each Taegeuk poomsae, the associated trigram not only reveals the underlying symbolism of the form, but also indicates how the footwork should be executed on each of the three major turns (a broken line for a pivot, a solid line when the turn is accomplished by moving the lead foot).
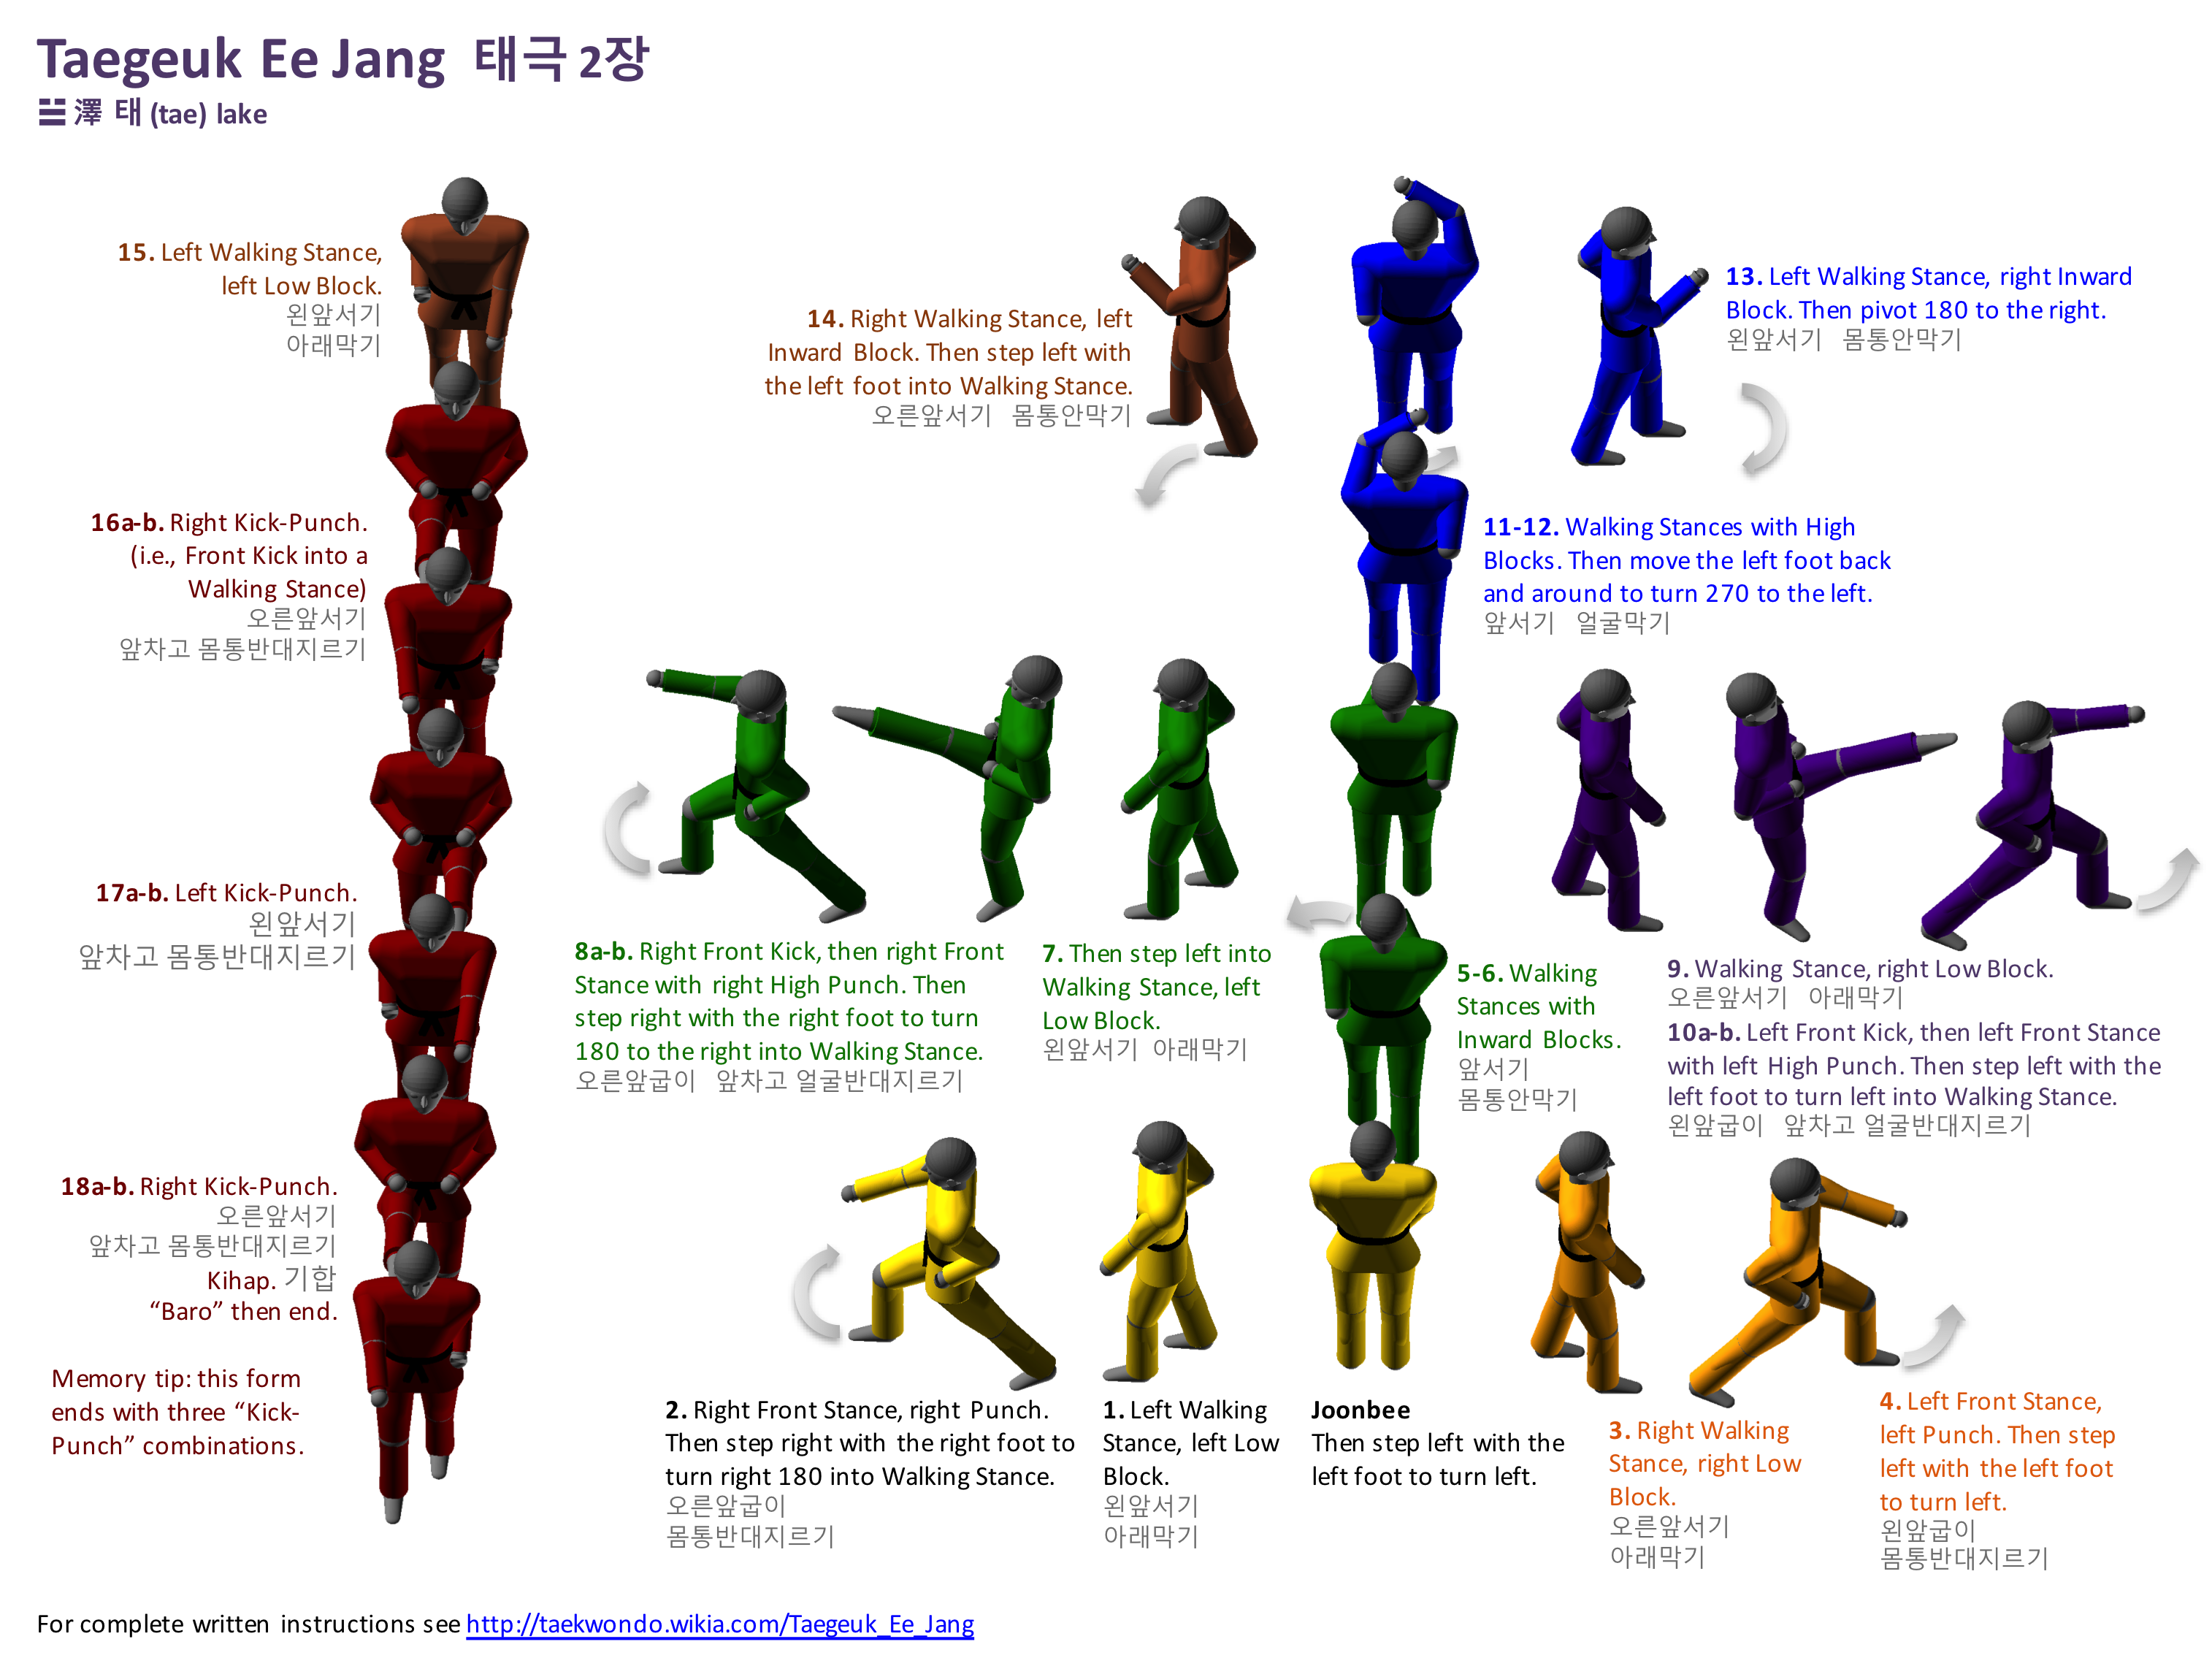
In this form the student practices in earnest the transition from Walking Stance to Long Front Stance; the key to good stance-work in TaeKwonDo is not just forming the stance, but also learning how to transition properly from one stance to the next. In this poomsae the Inside Middle Block is also seen (as it was in the Green Belt form); recall that performing this block requires that the student chamber well, and learn to “lead with the elbow” to generate snap and power.
As the student returns down the stem of the form (the red figurines in the above figure), they practice a kick-and-punch combination,which can require months of practice to learn to perform well – balance throughout the movement is required. You can read more about this form, including step-by-step instructions, here: Taegeuk Ee Jang. The videos below illustrate this poomsae as well as the Purple Belt kicking combination and breaking technique.
6th gup - Purple Belt, Taegeuk Yi Jang (step by step)
6th gup - Purple Belt, Taegeuk Yi Jang (with written instructions)
6th gup - Purple Belt, Taegeuk Yi Jang
6th gup - Purple Belt breaking
6th gup - Purple Belt kicking combination
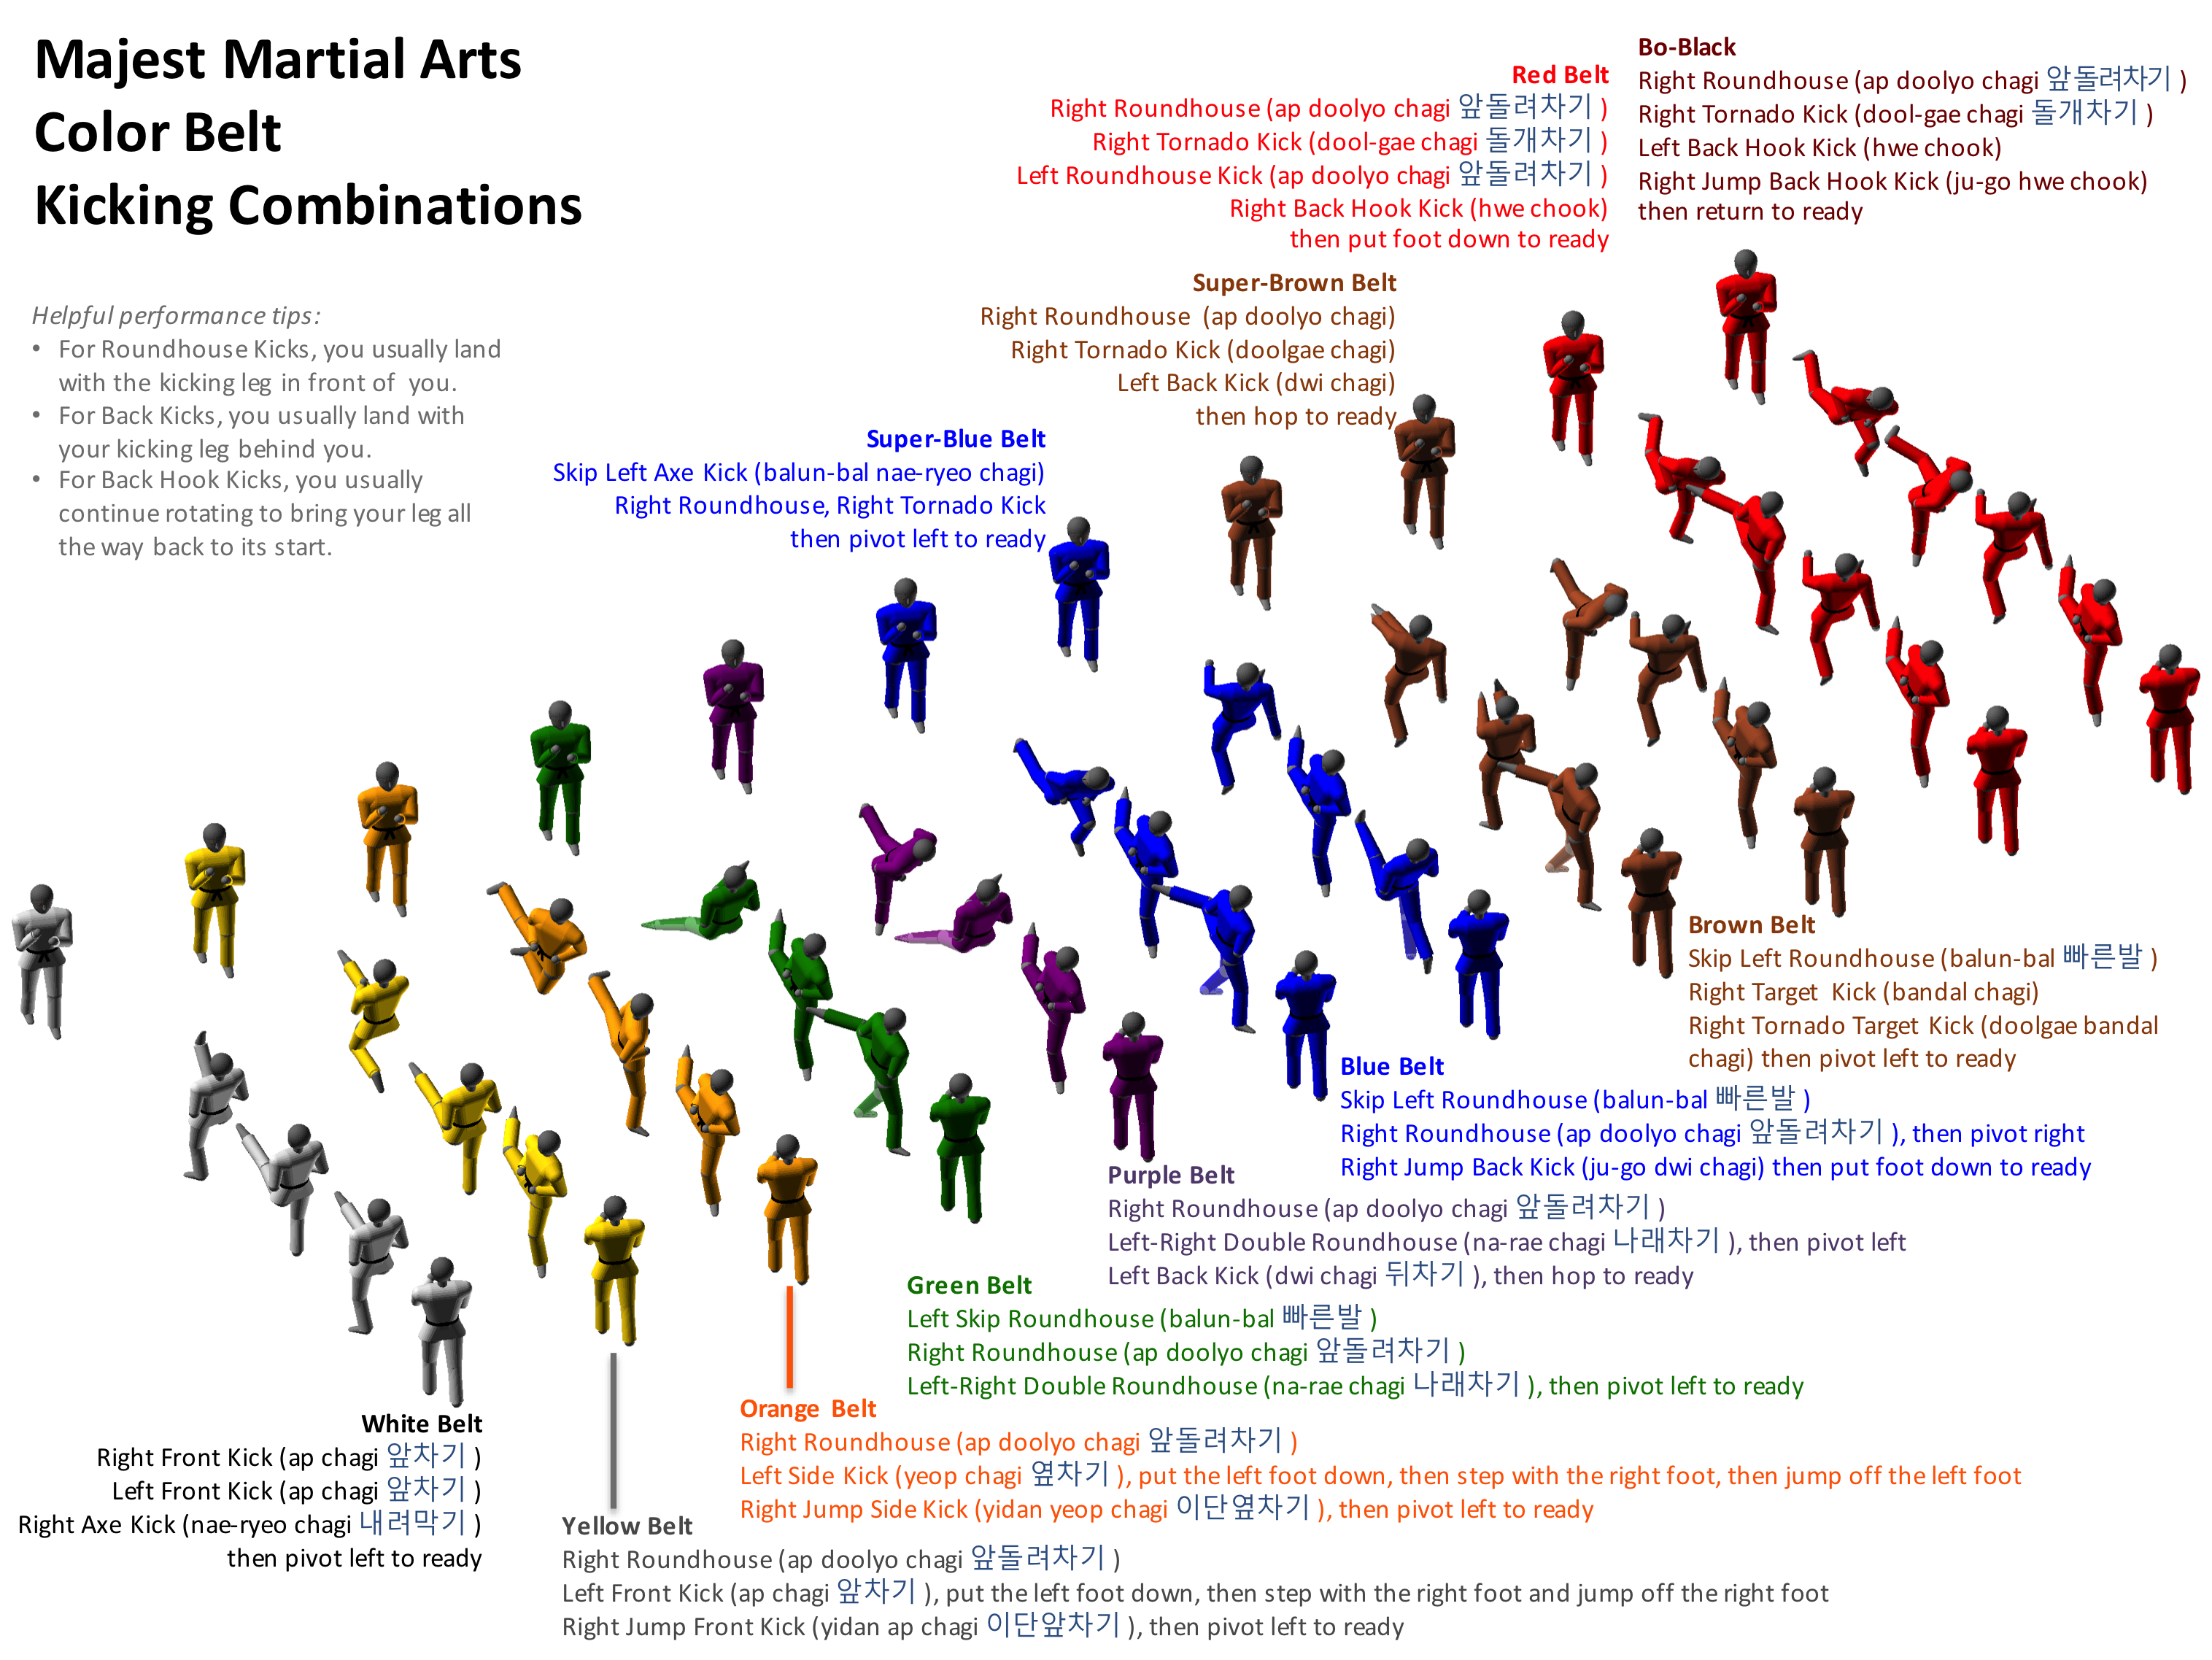
This video illustrates the Purple Belt kicking combination: a Roundhouse Kick (ap-doolyo chagi) with the right leg, a Double Roundhouse (na-rae chagi; left leg, then right leg), and then a Back Kick (dwi chagi) with the left leg. In a Double Roundhouse, the first kick is usually considered a “feint” — later in the student’s training however, they will be expected to break a board with this feint. Why? Because for a feint to be successful, even a feint must be delivered with speed and power in order to “sell” the feint.
Where am I supposed to land? At this point in the student’s instruction, the kicking combinations are becoming a bit more complex, and one of the more subtle points to understand is where to land your feet after a kick.
- For Roundhouse Kicks (including Tornado Kicks), the kicking leg usually lands in front of the body after the kick.
- For Back Kicks (including Jump Back Kicks) the kicking leg usually lands behind the body after the kick (the theory is that if your leg doesn’t naturally want to land behind you, you probably didn’t back-kick hard enough).
- For Back Hook Kicks (including Jump Back Hook Kicks) the kicking leg should come all-the-way back-around to the starting position (the theory being that your rotational momentum is bringing you a full 360 degrees back to the start).
Understanding these principles helps you to understand how to transition from one kick to the next in these more complex kicking combinations.
6th gup - How Parents Can Help
Certainly by this time your child is used to the “cadence” of TaeKwonDo training. They know that they must memorize their poomsae, learn their kicking combination, practice their board breaking, etc. Where they could use the most homework help is with their poomsae practice at home:
- Continue to make sure that when your child chambers for a Low Block, they do so with the base of the fist chambered at the collarbone. Not the knuckles.
- Continue to make sure that when your child chambers for an Inside Middle Block, they do so with the blocking arm bent, out to the side, with the first turned away from the body. As they block, they should “lead with the elbow” — imagine that the elbow is coming into position with the fist trailing. (In practice the fist moves with the elbow, but thinking of it as “lead with the elbow” helps learn the proper movement.) A common mistake is for students to simply ‘hoist’ the blocking arm into the final blocking position, without the arm having a chance to arc inward (as it would have to do to block).
- Continue to make sure that when your child chambers for the High Block, they do so with the blocking fist palm-up at the opposite waist, and the other fist thumb-on-collarbone.
- The kick-and-punch combination at the end of this form (steps 16-18) is particularly challenging. If done well, it should look like this: the child aims the knee to kick (as one always done with a Front Kick), extends the leg to kick, then bends the knee back again — all of this should be done without losing balance. Ideally the student should even be able to perform this kick and conclude by remaining standing on one leg! Then, aim the off hand, step down into Walking Stance and simultaneously Punch. If this written explanation is not clear, watch the “step by step” video above to get a better idea of what this should look like. In practice, what very often happens is that the student kicks off-balance, and “falls” into the Walking Stance / Punch — this is normal for beginning students. With practice, they’ll learn to maintain their balance while kicking, and then fall gracefully into the Walking Stance / Punch.